QA–QC BYUNS – Note – "This site uses cookies from Google to deliver its services to personalize ads and to analyze traffic information about your use of this site is shared with Google, BY USING THIS SITE YOU AGREE TO ITS USE OF COOKIES"

Sunday, April 12, 2020

EXCEL VBA, USE OF COMPID, FSO AND INPUTBOX

Option Explicit
-------------------------------------------
Sub findfileinfolder()

Call CountFiles

End Sub
---------------------------------------------
Private Function CountFiles()
Dim strDirectory As String, strDestFolder As String, strExt As String

strDirectory = InputBox("pl inter path for serch folder")

'strDestFolder = InputBox("pl inter path for output folder")

    Dim myfilesystemobject As Object
    Dim myfiles As Object
    Dim myFile As Object
    Dim Compld As Range
    Dim mystore As Variant
   
    Set myfilesystemobject = CreateObject("Scripting.FileSystemObject")
    Set myfiles = myfilesystemobject.GetFolder(strDirectory).Files
   
    For Each myFile In myfiles
           
       Range("B1").ClearContents
       Range("B1").Value = myFile.Name
       mystore = myFile.Name
       
        Set Compld = Range("A:A").Find(what:=mystore, LookIn:=xlValues, lookat:=xlWhole)
                   
            If Not Compld Is Nothing Then
            'Stop
                 With myFile
                    .Copy strDestFolder & "\" & myFile.Name
                 End With
            Else
            End If
         
    Next myFile
     
    Set myfiles = Nothing
    Set myfilesystemobject = Nothing
End Function


Wednesday, April 1, 2020

Metal transfer modes in GMAW

Metal transfer modes in GMAW

Metal transfer modes in GMAW

Globular 
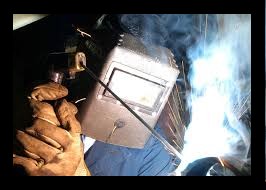
Globular  मेटल ट्रांसफर के साथ GMAW को तीन प्रमुख GMAW विविधताओं में से सबसे कम वांछनीय माना जाता है, क्योंकि इसकी उच्च गर्मी, खराब वेल्ड सतह और स्पैटर का उत्पादन करने की प्रवृत्ति है। विधि को मूल रूप से GMAW का उपयोग करके स्टील को वेल्ड करने के लिए एक लागत-कुशल तरीके के रूप में विकसित किया गया था क्योंकि यह भिन्नता कार्बन डाइऑक्साइड का उपयोग करती है, जो आर्गन की तुलना में एक कम महंगा परिरक्षण गैस है। जिससे 110 मिमी / एस (250 / मिनट) तक की वेल्डिंग गति की अनुमति दी जा सकती थी। जैसा कि वेल्ड किया जाता है, इलेक्ट्रोड से पिघली हुई धातु की एक गेंद इलेक्ट्रोड के अंत में निर्मित होती है, अक्सर इलेक्ट्रोड की तुलना में एक बड़े व्यास के साथ अनियमित आकार में होती है। जब छोटी बूंद या तो गुरुत्वाकर्षण या लघु-चक्कर द्वारा समाप्त हो जाती है, तो यह असमान सतह को छोड़ कर अक्सर स्पैटर का कारण बन जाती है। बड़ी पिघली हुई छोटी बूंद के परिणामस्वरूप, प्रक्रिया आमतौर पर फ्लैट और क्षैतिज वेल्डिंग पदों तक सीमित होती है, इसके लिए मोटे वर्कपीस की आवश्यकता होती है, और एक बड़े वेल्ड पूल में परिणाम होता है।

Ultrasonic Testing of Welds on Plates

Ultrasonic Testing of Welds on Plates

Ultrasonic Testing of Welds on Plates

For testing a weld satisfactorily, the following information should be available
(i) Material, (ii). Details of weld preparation, (iii). Welding process and probable defects expected, (iv) Applica­tion of the part and (v)Acceptance criteria.

Testing of a single 'V'butt joint welded only from one side using transverse waves.
The selection of probe frequency depends on the flaw to be detected and attenuation in the effects of the near zone and beam spread the minimum size of the material. Which varies with frequency should be considered. For mild steel welds usually, a frequency in the range of 1 MHz to 4 MHz will be satisfactory.

Ultrasonic Testing for laminations in plates

Ultrasonic Testing for laminations in plates 

Ultrasonic Testing for laminations in plates

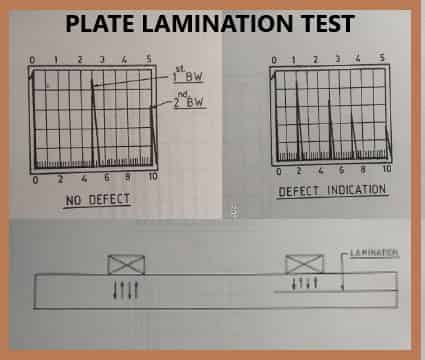
Ultrasonic Testing for laminations in plates - A normal probe is brought into contact with the face of the plate through a couplant. The height of the back wall echo is kept at a fixed amplitude (50% or above F.S.H.)

Any drop  1n  back wall echo is considered to be caused by defective area.   Usually, the plate is scanned along grid lines only and wherever the back wall echo falls beyond a  set level or when a defect indication is present,  the adjacent area is also scanned to determine the area of defect.   Some­ times angle beam technique is also used to detect the presence of defects that are not oriented parallel to the surface.

Tuesday, March 31, 2020

FORGING PROCESS

FORGING PROCESS

FORGING PROCESS

1.INTRODUCTION
Forging is a metal mass that has been worked or brought to a configuration attained by controlled plastic deformation, by hammering, pressing, upsetting, rolling extruding, etc. Aluminum, Copper and their alloys, steels, titanium and many other alloys can be forged.
Forging can be produced either by hot working or cold working.

CASTING PROCESS

CASTING PROCESS

CASTING PROCESS


1.INTRODUCTION


The basic of casting processes Is feeding of molten metal Into a cavity of the required shape In a mould, followed by cooling to produce a solid object. The various processes differ principally In the way In which tho mould Is formed. In some cases e.g., sand moulding, a mould Is made up for each cast and subsequently broken up to remove the casting. In other cases, e.g., die casting, a permanent mould Is used repeatedly for a succession of casts and the casting Is removed after each cast without damage to the mould. Provision Is made for the feeding of the casting by forming a gating system in the mould. At the same time, an enlarged opening (a pouring cup) Is made to enable easy pouring, and channels are cut to allow the metal to flow out of the mould cavity after filling it, thus maintaining a metallostaUc head during solidification.

Monday, March 30, 2020

GMAW WELDING PROCESS

GMAW WELDING PROCESS

GMAW WELDING PROCESS

GAS METAL ARC WELDING (GMAW)
In this process, an arc is maintained in a stream of inert gas between a consumable electrode and the workpiece. The arc heats the work and melts the electrode, which thus supplier filler metal for the joint.   The power sources used are direct current with electrode positive.   The metal transfer is irregular if the electrode is negative or if the alternating current is the use of whilst effective welding of aluminum is only possible if the workpiece is negative so that oxide film is removed by the action of the arc cathode.

Arc Welding with Coated Electrode (SMAW)

Arc Welding with Coated Electrode

Arc Welding with Coated Electrode

Arc welding is carried out by striking an arc between a rod electrode and the workpiece, thus simultaneously heating the workpiece and melting the electrode, which supplies filler metal for the joint. The power supply used In welding with coated electrodes consists of a DC or AC source with a dropping characteristic.

Sunday, March 29, 2020

SOME RADIATION CALCULATION FORMULAS AND EXAMPLES

SOME RADIATION CALCULATION FORMULAS AND EXAMPLES

SOME RADIATION CALCULATION FORMULAS AND EXAMPLES

SOURCE TO FILM DISTANCE CALCULATION

SFD (min)= t(1+d/ug)

t= thickness of job
d= source size
ug= 0.5 max

INTRODUCTION TO NON- DESTRUCTIVE TESTING (NDT)

NDT

INTRODUCTION TO NON- DESTRUCTIVE TESTING

INTRODUCTION

Non-destructive testing (NDT) Is a  method of quality control of materials without disturbing their aimed use.  The material under Inspection does not undergo any change In Its size, shape, physical and chemical properties. It is commonly used for:

Detection of flaws such as cracks, shrinkages, gas porosities, inclusions, and another weld, forging and casting defects.
Determining the material characteristics such as density, conductivity, hardness, grain structures, etc. to give clues about the strength of materials.
Dimensional measurements such as wall thickness, internal and outside dimensions, corrosion assessment coating/plating thickness, etc.
On-line monitoring of plants/ industrial systems.

IMAGE QUALITY INDICATORS

IMAGE QUALITY INDICATORS

IMAGE QUALITY INDICATOR

Image quality indicator (IQI), also called penetrameter is a device used to judge the quality of radiography.  This is measured in terms of radiographic sensitivity. smaller the numerical value of radiographic sensitivity. better the radiographic quality. Image quality indicators are of simple geometric form and made of the same or similar material as the specimen being examined. The image of the IQI on the radiograph is permanent evidence that the radiographic inspection was conducted under proper conditions.

A number of  IQI designs are used by different authorities in the world. There are American Standards,  British standards, French, German, International and Indian standards. Some of the most commonly used IQI designs are mentioned below.

Saturday, March 28, 2020

INDUSTRIAL RADIOGRAPHY

RADIOGRAPHY TERMS

MOTTLING - mottling is occurred in industrial radiography due to diffraction, this can be reduced by increasing KV and using lead foil screen.
in compare to 40kv film, 60kv film exposure film with time compensation film has lower contrast and greater latitude.

AVERAGE GRADIENT- It is a characteristic curve between exposure vs optical density.

LATITUDE- (X-Ray Film) the range of specimen thickness that can be adequately recorded on the radiography is referred to as the latitude.

DARK ROOM

DARK ROOM

DARKROOM

Dark Room is a room where industrial film loading & film development is done, a typical layout is shown above.

Every darkroom has a safe light in which all the above work is carried out (red light) called safe light.

Industrial Radiography Film Processing

Industrial Radiography Film Processing

Industrial Radiography Film Processing

It has 4 parts
1) Developing 5-8 min Temp 68deg F (20deg C)
2) Stop Bath (Arresting development) 65-70dec F 30- 60 sec
3) Fixation – 65-70 deg F, 8-15min
4) Washing – 20-30min

Developing- developing solution has the ability to reduce the silver bromide crystals on the exposed part of films to metallic silver.
The time required to develop is 5 to 8 min at 20deg cent of solution (developer)
Longer developing time will produce chemical fog and this will decrease the film contrast.
Low temperatures can slow the action while the high temperatures can fog the film or soften the emulsion on the film so that it will wrinkle or wash off.

Saturday, March 14, 2020

Etching Test in welder qualification

Etching test -

ETCHING TEST is used to find the soundness of the weld and also, it makes the boundary between the base metal and weld metal clearly visible.


Etching Test in welder qualification

Test procedure-
Cut the test piece with the help of power saw from the welded joint (complete transverse section of the weld). 

Monday, March 9, 2020

STOP COMPLAINING

STOP COMPLAINING

Special Note- this is only for entertainment, it is not related to any person or group.
STOP COMPLAINING

happy holi... 

my inspection philosophy THE WAY I DO INSPECTION


Sunday, March 8, 2020

CPC KYA HAI

CPC KYA HAI

CPC KYA HAI?
QUALITY CPM
CPC: मूल्य प्रति क्लिक क्या है?
सीपीसी प्रति क्लिक मूल्य है, या आपके भुगतान-प्रति-क्लिक (पीपीसी) मार्केटिंग अभियानों में प्रत्येक क्लिक के लिए आपके द्वारा भुगतान की जाने वाली कीमत है। 

Monday, March 2, 2020

quality control vs quality assurance

quality control vs quality assurance

quality control vs quality assurance

QA and QC are both part of the Quality management system and these are the powerful techniques  that can be used to ensure that the manufactured parts are as per quality requirements. 

Project Management

qaqc byuns

Project Management

1.   SCOPE
The purpose of the following procedure is to describe the Project Management activity, which is the set of activities aimed at analyzing, planning and implementing the objectives of a project.
2.   APPLICABILITY
This procedure is mainly applied to the railway sector.

Sunday, March 1, 2020

Failure Mode and Effect Analysis

Failure Mode and Effect Analysis

Failure Mode and EffecAnalysis of a product

1.   PURPOSE


FMEA is a methodology used to analyze the failure or defect of a process, product or system and to plan the preventive  (or corrective)  actions necessary to mitigate the risk of occurrence of a  given defect.  The acronym comes from the English name Failure Modes and Effects Analysis.

Risk Management & Contingency Plan

Risk Management & Contingency Plan

Risk Management & Contingency Plan

1.   SCOPE
The scope of this procedure is to describe the modes adopted by the organization for identifying the potential risks of interruption of production activities linked to the organization itself and to define the procedures needed to be activated in case of emergency. Furthermore are analyzed the risks linked to the main ‘  ‘your firm’  processes, defined in the chapter 4_0  Context of the organization.

Saturday, February 29, 2020

Customer complaints management

Customer complaints management

Customer complaints management

1. PURPOSE
The purpose of this procedure is to define the methods used by the firm. for managing complaints from customers.

Procedure for monitoring customer satisfaction

Procedure for monitoring customer satisfaction

Procedure for monitoring customer satisfaction

1. PURPOSE
The purpose of this procedure is to describe the guidelines, used by, to monitor and measure customer satisfaction.

PROCESS SHEET

QA-QC BYUNS

PROCESS SHEET

QUALITY PROCEDURE 5S METHOD

QUALITY PROCEDURE 5S METHOD

QUALITY PROCEDURE 5S METHOD

1.   SCOPE
The scope of this procedure is to establish methodologies, responsibilities, and means for implementation of the S method within the Organization.

Wednesday, February 26, 2020

PWHT, Stress reliving Procedure

PWHT, Stress reliving Procedure

 PWHT / Stress reliving Procedure

1.0 Scope:-
This describes the Procedures Provide information for heat treatment (Stress relieving only) for Carbon steel, alloy steel.
2.0 Reference Codes & Specification:-
• ASME Section VIII Div.1
• AWS D1.1
• Railway Specification.
• Manufacturing Drawing.
• Welder Procedure specification.

Tuesday, February 25, 2020

Procedure for Straightening by Heat Correction method for Structure

Procedure for Straightening by Heat Correction

Procedure for Straightening by Heat Correction

Thermal techniques
"The basic principle behind the thermal process is to create high local stress so that, on cooling, the job is pulled back into shape. Local heating is a simple and effective process of correcting distortion. This process requires a lot of experience as there is no standard rule of shrinkage so any new job if repair is required then first it should be tested to establish correct shrinkage"

Buy Car & Vehicle Electronics Online

Buy Car & Vehicle Electronics Online

Car & Vehicle Electronics 

car electronic

Buy Car & Vehicle Electronics Online at Amazon.in click the above link to buy...

कदम पर कुरकुरा, शक्तिशाली ध्वनि की मांग? निर्देशों के साथ मदद के लिए कार वीडियो या जीपीएस नेविगेशन सिस्टम खोज रहे हैं? अमेज़ॅन इंडिया आपको कार और वाहन इलेक्ट्रॉनिक्स की एक श्रृंखला के लिए ऑनलाइन खरीदारी करते समय एक शानदार अनुभव प्रदान करने के लिए समर्पित है। आप कार स्टीरियो, स्पीकर, लाइट, वायरलेस किट, चार्जर, जीपीएस सिस्टम, वैक्यूम क्लीनर और सुरक्षित और कई ऑनलाइन भुगतान विकल्पों के साथ सस्ती कीमतों पर खरीद सकते हैं। मनोरंजन और सुविधा संपन्न सिस्टम खोजने के लिए वाहन इलेक्ट्रॉनिक्स की लोकप्रिय श्रेणियों और सबसे ज्यादा बिकने वाली कार स्टीरियो के माध्यम से ब्राउज़ करें। दैनिक आवागमन या लंबी यात्राएं, जब आप एक ऐसी कार चलाना शुरू करते हैं, जो सभी इलेक्ट्रॉनिक प्रणालियों से सुसज्जित होती है, तो वे सभी अधिक सुखद होती हैं।

Monday, February 24, 2020

Preheating is Important

WHY PREHEATING IS IMPORTANT


Why Preheating is Important?

Preheating minimizes the temperature difference between the arc and the material being welded. This benefits the weldment in the following ways.

1. it helps to reduce shrinkage stresses that can lead to cracking and distortion. 

Sunday, February 23, 2020

CERAMIC BACKING STRIPS

CERAMIC BACKING STRIPS

CERAMIC BACKING STRIPS 

 ACHIEVEs

• X-Ray quality root welds In one
• Fu.ll penetration welds from one    
• Uniform back beads of finished quality 
• Root weld end fill in one pass
Application of Ceramic Backing Strip

3metres/minute and produce excellent and accurate bevels. The plates can be beveled, over a range of
6mm to 58mm; and the maximum bevel that can be cut is 28mm. A range of bevellers are available for bevelling different sections of Carbon Steel, Aluminum, Stainless Steel, and Titanium.

HOLI 2021 SPECIAL

HOLI 2020 HOLI KE RANG

होली स्पेशल क्लिक करे यहाँ 

फागुन लाया होली संग 
फैल गया सबमें उमंग 

फूलों के खिलनें से 

महक उठा सारा उपवन 

Saturday, February 22, 2020

WELD AND MAGNETIC FIELD

WELD AND MAGNETIC FIELD

Effect of Magnetic Field on Welding...

EFFECT ON WELD GEOMETRY

A magnetic field can deflect the arc perpendicular to the welding direction as AC current changes its direction because the direction of electrons changes and this changes the direction of the force on them. This way arc is deflected from the line of a weld. This results in an increase in bead width also. 

Friday, February 21, 2020

How to fix a logo in word

How to fix a logo in word

How to fix a logo in word


If you insert a logo by a conventional method, as shown in below picture then anyone can edit it in your office who don't know about developer tab (VBA)
LOGO

To fix the logo, you need to activate the developer tab in your word or excel

Monday, February 17, 2020

shrinkage a big factor in welding

shrinkage a big factor in welding

How to calculate shrinkage in welding

What is shrinkage?

In a welded joint, expansion and contraction forces act on the weld metal and on the base metal. As the weld metal solidifies and fuses with the base metal, in this stage, it is in its maximum expanded form. While cooling, weld metal contract to the volume it would normally occupy at the room temperature, but it is restricted by the adjacent base metal. Because of this, stresses develop within the weld metal and the adjacent base metal. 

Saturday, February 15, 2020

HEAT INPUT IN ARC WELDING

HEAT INPUT IN ARC WELDING

ARC ENERGY AND HEAT INPUT IN ARC WELDING

In arc welding process, heat input HI and arc energy AE are measures of how much heat input has been supplied to the job being welded. unit of HI is kj/mm or kj/in. If travel speed is in mm then unit will be kj/mm

arc energy AE  =  60VI / 1000s

I   =  CURRENT IN AMPS
V  = VOLTAGE
 s  = TRAVEL SPEED OF WELDING

Thursday, February 13, 2020

AUDIBLE AUDIOBOOKS

AUDIBLE AUDIOBOOKS

AUDIBLE AUDIOBOOKS

ऑडिबल ऑडियो  बुक्स - आज के व्यस्त जीवन ने पढ़ने का समय कहाँ बचा है, खाली समय, जिस समय आप आराम कर रहे हों , बस एअर फोन लगाइये और आराम से सारी  किताब सुन लीजिये.

Wednesday, February 12, 2020

INDUSTRIAL PAINTING, CALCULATE PAINT CONSUMPTION

INDUSTRIAL PAINTING

INDUSTRIAL PAINTING, CALCULATE PAINT CONSUMPTION

What is volume solids in painting-

All paints are made up of resign, pigments solvents and adhesive ( like stabilizers, anti-foams, and thickeners). After the paint is applied solvent evaporates and leaving only the dry SOLIDS in the form of a continuous coating. the solid can be expressed as a volume percentage of the entire volume of the can of paint. 
example- if a solvent is half of the paint volume then we can say that the paint is 50% solid.
means if the wet film thickness is 100 microns means after drying we shall get 50 microns in thickness.

Sunday, February 9, 2020

my inspection philosophy THE WAY I DO INSPECTION

INSPECTION WITH FUN


INSPECTION-WITH-FUN

INSPECTION WITH FUN

QA-QC BYUNS

MY INSPECTION PHILOSOPHY

Quality improvement is the responsibility of everyone at all levels in the company, rather than those of the quality department only

RAMS and LCC in rail product

RAMS and LCC in rail product

RAMS and LCC in rail product manufacturing

RAMS and LCC are important factors in the rail sector.
All give great importance to this aspect throughout the project in the rail industry, like vehicles and their components. A customer requires reliable products that are easily maintainable throughout its lifetime. The cost of the product in the rail sector is affected by initial cost and also by operating and maintenance costs during its lifetime. All costs are added in the life of LCC from concept to last use of a product.

MAINTENANCE IN RAIL SECTOR

maintenance in rail products

MAINTENANCE IN RAIL MANUFACTURING 

"Maintenance" in the rail product manufacturing sector is necessary in order to
guarantee the safety, availability, and the comfort of a customer. It shall also heighten the lifetime of the products throughout the life cycle cost management.

TERMS USED IN ISO 22163

Abbreviations of terms used in ISO:22163-2017

 Abbreviations
EPPPS                  Externally Provided Process, Product and services
FAI                        First Article Inspection
FMEA                   Failure Mode, Effects and Criticality Analysis
FMECA                Failure Reporting Analysis and Corrective Action 

System
KPI                       Key Performance Indicator
LCC                      Life Cycle Costing
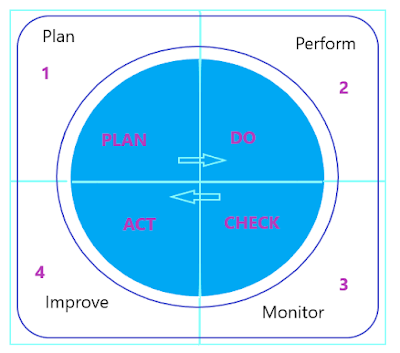
PDCA                    Plan – Do – Check – Act
QDC                      Quality Deficiency Cost
RAM                     Reliability, Availability, Maintainability
RAMS                   Reliability, Availability, Maintainability, Safety
RQMS                   Rail Quality Management System
SIL                         Safety Integrity Level   
         “Shall” indicates a requirement;
         “Should” indicates a recommendation;
         “May” indicates permission;
         “Can” indicates a possibility or a capacity.    
     
      PDCA DIAGRAM

PDCA


First Article Inspection

First Article Inspection


PURPOSE OF FAI

Purpose of FAI (first article inspection ) is to give objective & a documented record that all design, specification & requirements are correctly understood, verified, and recorded, also to validate the processes (including manufacturing gauges, jigs, and fixtures) of a new Product & major upgrade of any existing can be considered as a final requirement to release the mass production.

Saturday, February 8, 2020

8D MANAGEMENT TOOL

8D MANAGEMENT TOOL

WHAT IS 8D ( MANAGEMENT TOOL )

THE EIGHT DISCIPLINES (8D)
8 steps to solve any problem in an organization-


1: Create a group of people who know the activities and the company.

2: Define the problem.

3: Implement provisionally. 

4: Identify the cause. of the incidence.

5: Determine permanent corrective actions (PCAs).

6: Implement permanent corrective actions.

7: Prevent similar problems. 

8: Recognize the team’s work. (rewards)


Result: The use of the 8D method allows to improve a product, services, and processes.
---------------------------------
8D

8D क्या होता है?

किसी संगठन में किसी भी समस्या को हल करने के लिए 8 कदम-
1: गतिविधियों और कंपनी को जानने वाले लोगों का एक समूह बनाएँ।
2: समस्या को परिभाषित करें।
3: अनंतिम रूप से लागू करें।
4: कारण की पहचान करें। घटना का।
5: स्थायी सुधारात्मक कार्यों (पीसीए) का निर्धारण करें।
6: स्थायी सुधारात्मक कार्यों को लागू करें।
7: इसी तरह की समस्याओं को रोकें।
8: टीम के काम को पहचानो। (पुरस्कार)


परिणाम: 8D विधि का उपयोग किसी उत्पाद, सेवाओं और प्रक्रियाओं को बेहतर बनाने में मदद देता  है।


Key performance indicators

    Key performance indicators

 What makes a KPI effective?

KPI MUST BE SMART


 What makes a KPI effective?
qa-qc byuns


KPI stands for key performance indicator it is valuable as the action it inspires.

for preparing a KPI, a team should start with the basics and understand the organizational objectives,
make a plan to achieve them, and decide who will act on this information. Interact with department heads and take feedback.

Friday, February 7, 2020

HOLI 2021 HOLI KE RANG

HOLI 2020 HOLI KE RANG

HOLI 2021,  होली के रंग 

HOLI 2020 HOLI KE RANG

HOLI 2020 HOLI KE RANG

HOLI 2020 2
HOLI 2021,  होली के रंग 


फागुन लाया होली संग 
फैल गया सबमें उमंग 

फूलों के खिलनें से 
महक उठा सारा उपवन 

रंग बिरंगी तितलियों से 
सज गया सारा गुलशन 

फूलों से पीकर भंग  
गुनगुनाएं भवरे भी संग 

हरे पीले नील रंगों से 
हुआ आसमाँ  का भी इन्द्र  धनुषी रंग

आओ बच्चों मिलजुल हम  
ऐसी मचाएं होली की हुड़दंग 

बन जाएँ सब दोस्त हमारे 
रहें न कोई भी दुश्मन 

ऐसी कोई छेड़ें सरगम 
गूंजे सब में एकता की तरंग 
HOLI 2020 HOLI KE RANG


Image by Prawny from Pixabay