WELDER ID - 301054
Friday, January 22, 2021
Friday, January 1, 2021
use of Environ("USERPROFILE") in excel vba
use of Environ("USERPROFILE") in excel vba
How to make a path as dynamic by using ENVIRON
IF path= E:\Redirect\un.singh\Desktop then I can make it dynamic BY use of vba by replacing "E:\Redirect\un.singh" with Environ("USERPROFILE") & \Desktop
one simple example is as under-
Sub hyper_link()Dim FileName, mystore As StringDim PathName As String, i As Long'AUTO SELECT USER DESKTOP NAMEPathName = Environ("USERPROFILE") & "\Desktop\ALL DRGS\"FileName = Dir(PathName & "*.pdf")Do While FileName <> vbNullStringmystore = Mid(FileName, 5, 8)On Error GoTo last:'COMPARE MYSTORE FOR ALL CELLS OF COLUMN "B"For i = 2 To 374If mystore = Left(Range("B" & i).Value, 8) ThenRange("B" & i).SelectActiveSheet.Hyperlinks.Add Range("B" & i), Address:=(PathName & FileName)Else: End IfNext i'NEXT FILE FOR MYSTOREFileName = DirLooplast:End Sub
Sunday, April 12, 2020
EXCEL VBA, USE OF COMPID, FSO AND INPUTBOX
Option Explicit
-------------------------------------------
Sub findfileinfolder()
Call CountFiles
End Sub
---------------------------------------------
Private Function CountFiles()
Dim strDirectory As String, strDestFolder As String, strExt As String
strDirectory = InputBox("pl inter path for serch folder")
'strDestFolder = InputBox("pl inter path for output folder")
Dim myfilesystemobject As Object
Dim myfiles As Object
Dim myFile As Object
Dim Compld As Range
Dim mystore As Variant
Set myfilesystemobject = CreateObject("Scripting.FileSystemObject")
Set myfiles = myfilesystemobject.GetFolder(strDirectory).Files
For Each myFile In myfiles
Range("B1").ClearContents
Range("B1").Value = myFile.Name
mystore = myFile.Name
Set Compld = Range("A:A").Find(what:=mystore, LookIn:=xlValues, lookat:=xlWhole)
If Not Compld Is Nothing Then
'Stop
With myFile
.Copy strDestFolder & "\" & myFile.Name
End With
Else
End If
Next myFile
Set myfiles = Nothing
Set myfilesystemobject = Nothing
End Function
Wednesday, April 1, 2020
Metal transfer modes in GMAW
Metal transfer modes in GMAW
Globular
Globular मेटल ट्रांसफर के साथ GMAW को तीन प्रमुख GMAW विविधताओं में से सबसे कम वांछनीय माना जाता है, क्योंकि इसकी उच्च गर्मी, खराब वेल्ड सतह और स्पैटर का उत्पादन करने की प्रवृत्ति है। विधि को मूल रूप से GMAW का उपयोग करके स्टील को वेल्ड करने के लिए एक लागत-कुशल तरीके के रूप में विकसित किया गया था क्योंकि यह भिन्नता कार्बन डाइऑक्साइड का उपयोग करती है, जो आर्गन की तुलना में एक कम महंगा परिरक्षण गैस है। जिससे 110 मिमी / एस (250 / मिनट) तक की वेल्डिंग गति की अनुमति दी जा सकती थी। जैसा कि वेल्ड किया जाता है, इलेक्ट्रोड से पिघली हुई धातु की एक गेंद इलेक्ट्रोड के अंत में निर्मित होती है, अक्सर इलेक्ट्रोड की तुलना में एक बड़े व्यास के साथ अनियमित आकार में होती है। जब छोटी बूंद या तो गुरुत्वाकर्षण या लघु-चक्कर द्वारा समाप्त हो जाती है, तो यह असमान सतह को छोड़ कर अक्सर स्पैटर का कारण बन जाती है। बड़ी पिघली हुई छोटी बूंद के परिणामस्वरूप, प्रक्रिया आमतौर पर फ्लैट और क्षैतिज वेल्डिंग पदों तक सीमित होती है, इसके लिए मोटे वर्कपीस की आवश्यकता होती है, और एक बड़े वेल्ड पूल में परिणाम होता है।
Ultrasonic Testing of Welds on Plates
Ultrasonic Testing of Welds on Plates
(i) Material, (ii). Details of weld preparation, (iii). Welding process and probable defects expected, (iv) Application of the part and (v)Acceptance criteria.
Testing of a single 'V'butt joint welded only from one side using transverse waves.
The selection of probe frequency depends on the flaw to be detected and attenuation in the effects of the near zone and beam spread the minimum size of the material. Which varies with frequency should be considered. For mild steel welds usually, a frequency in the range of 1 MHz to 4 MHz will be satisfactory.
Labels:
NDT
Ultrasonic Testing for laminations in plates
Ultrasonic Testing for laminations in plates
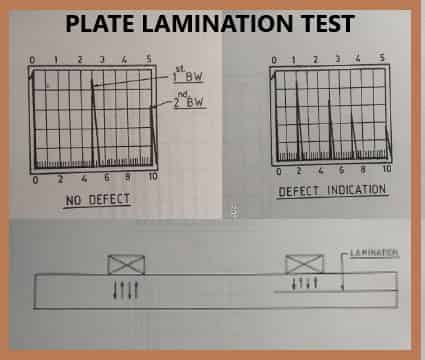
Ultrasonic Testing for laminations in plates - A normal probe is brought into contact with the face of the plate through a couplant. The height of the back wall echo is kept at a fixed amplitude (50% or above F.S.H.)
Any drop 1n back wall echo is considered to be caused by defective area. Usually, the plate is scanned along grid lines only and wherever the back wall echo falls beyond a set level or when a defect indication is present, the adjacent area is also scanned to determine the area of defect. Some times angle beam technique is also used to detect the presence of defects that are not oriented parallel to the surface.
Tuesday, March 31, 2020
FORGING PROCESS
FORGING PROCESS
1.INTRODUCTION
Forging is a metal mass that has been worked or brought to a configuration attained by controlled plastic deformation, by hammering, pressing, upsetting, rolling extruding, etc. Aluminum, Copper and their alloys, steels, titanium and many other alloys can be forged.
Forging can be produced either by hot working or cold working.
CASTING PROCESS
CASTING PROCESS
1.INTRODUCTION
The basic of casting processes Is feeding of molten metal Into a cavity of the required shape In a mould, followed by cooling to produce a solid object. The various processes differ principally In the way In which tho mould Is formed. In some cases e.g., sand moulding, a mould Is made up for each cast and subsequently broken up to remove the casting. In other cases, e.g., die casting, a permanent mould Is used repeatedly for a succession of casts and the casting Is removed after each cast without damage to the mould. Provision Is made for the feeding of the casting by forming a gating system in the mould. At the same time, an enlarged opening (a pouring cup) Is made to enable easy pouring, and channels are cut to allow the metal to flow out of the mould cavity after filling it, thus maintaining a metallostaUc head during solidification.
Monday, March 30, 2020
GMAW WELDING PROCESS
GMAW WELDING PROCESS
GAS METAL ARC WELDING (GMAW)
In this process, an arc is maintained in a stream of inert gas between a consumable electrode and the workpiece. The arc heats the work and melts the electrode, which thus supplier filler metal for the joint. The power sources used are direct current with electrode positive. The metal transfer is irregular if the electrode is negative or if the alternating current is the use of whilst effective welding of aluminum is only possible if the workpiece is negative so that oxide film is removed by the action of the arc cathode.
Arc Welding with Coated Electrode (SMAW)
Arc Welding with Coated Electrode
Arc welding is carried out by striking an arc between a rod electrode and the workpiece, thus simultaneously heating the workpiece and melting the electrode, which supplies filler metal for the joint. The power supply used In welding with coated electrodes consists of a DC or AC source with a dropping characteristic.
Sunday, March 29, 2020
INTRODUCTION TO NON- DESTRUCTIVE TESTING (NDT)
INTRODUCTION TO NON- DESTRUCTIVE TESTING
INTRODUCTION
Non-destructive testing (NDT) Is a method of quality control of materials without disturbing their aimed use. The material under Inspection does not undergo any change In Its size, shape, physical and chemical properties. It is commonly used for:Detection of flaws such as cracks, shrinkages, gas porosities, inclusions, and another weld, forging and casting defects.
Determining the material characteristics such as density, conductivity, hardness, grain structures, etc. to give clues about the strength of materials.
Dimensional measurements such as wall thickness, internal and outside dimensions, corrosion assessment coating/plating thickness, etc.
On-line monitoring of plants/ industrial systems.
IMAGE QUALITY INDICATORS
IMAGE QUALITY INDICATORS
Image quality indicator (IQI), also called penetrameter is a device used to judge the quality of radiography. This is measured in terms of radiographic sensitivity. smaller the numerical value of radiographic sensitivity. better the radiographic quality. Image quality indicators are of simple geometric form and made of the same or similar material as the specimen being examined. The image of the IQI on the radiograph is permanent evidence that the radiographic inspection was conducted under proper conditions.
A number of IQI designs are used by different authorities in the world. There are American Standards, British standards, French, German, International and Indian standards. Some of the most commonly used IQI designs are mentioned below.
Saturday, March 28, 2020
INDUSTRIAL RADIOGRAPHY
RADIOGRAPHY TERMS
MOTTLING - mottling is occurred in industrial radiography due to diffraction, this can be reduced by increasing KV and using lead foil screen.
in compare to 40kv film, 60kv film exposure film with time compensation film has lower contrast and greater latitude.
AVERAGE GRADIENT- It is a characteristic curve between exposure vs optical density.
LATITUDE- (X-Ray Film) the range of specimen thickness that can be adequately recorded on the radiography is referred to as the latitude.
Industrial Radiography Film Processing
Industrial Radiography Film Processing
It has 4 parts
1) Developing 5-8 min Temp 68deg F (20deg C)
2) Stop Bath (Arresting development) 65-70dec F 30- 60 sec
3) Fixation – 65-70 deg F, 8-15min
4) Washing – 20-30min
Developing- developing solution has the ability to reduce the silver bromide crystals on the exposed part of films to metallic silver.
The time required to develop is 5 to 8 min at 20deg cent of solution (developer)
Longer developing time will produce chemical fog and this will decrease the film contrast.
Low temperatures can slow the action while the high temperatures can fog the film or soften the emulsion on the film so that it will wrinkle or wash off.
Saturday, March 14, 2020
Monday, March 9, 2020
Sunday, March 8, 2020
Monday, March 2, 2020
Sunday, March 1, 2020
Failure Mode and Effect Analysis
Failure Mode and Effect Analysis of a product
1. PURPOSE
FMEA is a methodology used to analyze the failure or defect of a process, product or system and to plan the preventive (or corrective) actions necessary to mitigate the risk of occurrence of a given defect. The acronym comes from the English name Failure Modes and Effects Analysis.
Risk Management & Contingency Plan
Risk Management & Contingency Plan
1. SCOPE
The scope of this procedure is to describe the modes adopted by the organization for identifying the potential risks of interruption of production activities linked to the organization itself and to define the procedures needed to be activated in case of emergency. Furthermore are analyzed the risks linked to the main ‘ ‘your firm’ processes, defined in the chapter 4_0 Context of the organization.
Saturday, February 29, 2020
Subscribe to:
Posts (Atom)


